



















Valentine’s Day is the perfect time to celebrate the special person in your life and cherish the memories you’ve made together. It’s also the perfect chance to dress up to the nines with killer outfits and accessories for this special day. But why stop there. I have two fabulous nail designs to take your manicure to the next level this Valentine’s Day (or Galentine’s Day). So keep reading for a step by step tutorial on how you can create these amazing “love” themed nails for Valentine’s Day.
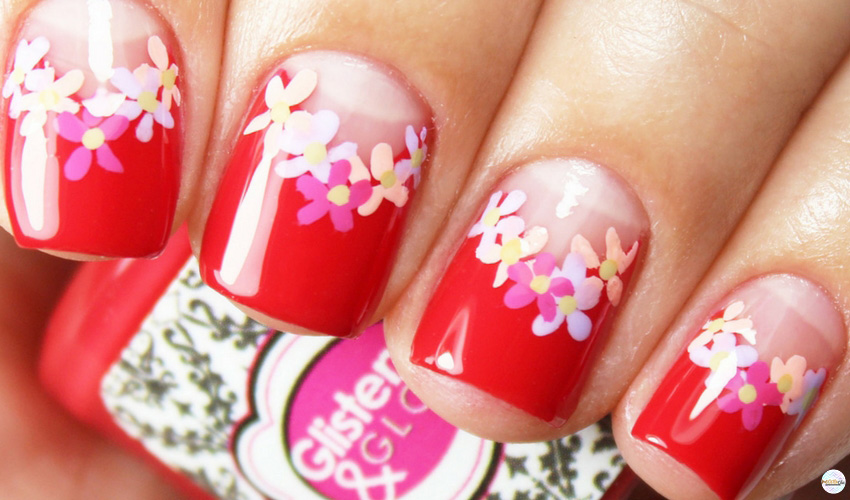
Nail Lookbook #1: Negative Space Flowers
What You Will Need
- Base Coat
- Red Polish
- Nail Vinyl
- Acrylic Paints
- Nail Art Brush
- Glossy Top Coat
DIRECTIONS:
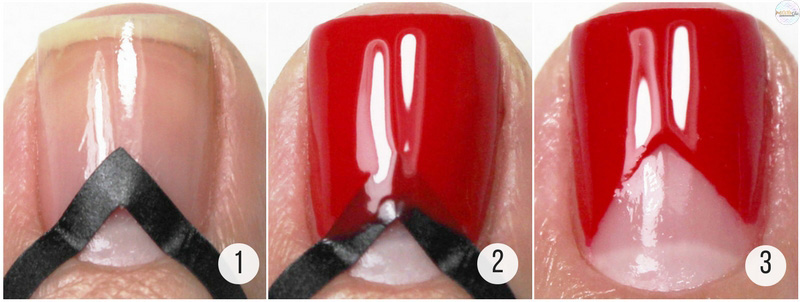
Step 1: Apply the nail vinyl.
Step 2: Paint the red polish on the areas above the nail vinyl. I do a thicker coat of polish to try to make it opaque as possible. You have to work quickly with nail vinyls. You must peel away the nail vinyl before it dries.
Step 3: Once the nail vinyl has been pulled away, it should reveal a clean line of polish. The line doesn’t need to be perfect since we are going to cover it with flowers. You have the option to protect this layer of polish with a coat of top coat. The top coat with protect the bottom layers in case there are any mistakes with the acrylic paints that are going on top.
I chose three different colors of acrylic paints: pink, lavender, and a hot pink. I want to alternate the pink and purple flowers, so i painted these designs with that in mind. Dip a thin nail art brush into the acrylic paint. Paint on the petals with short brush strokes .
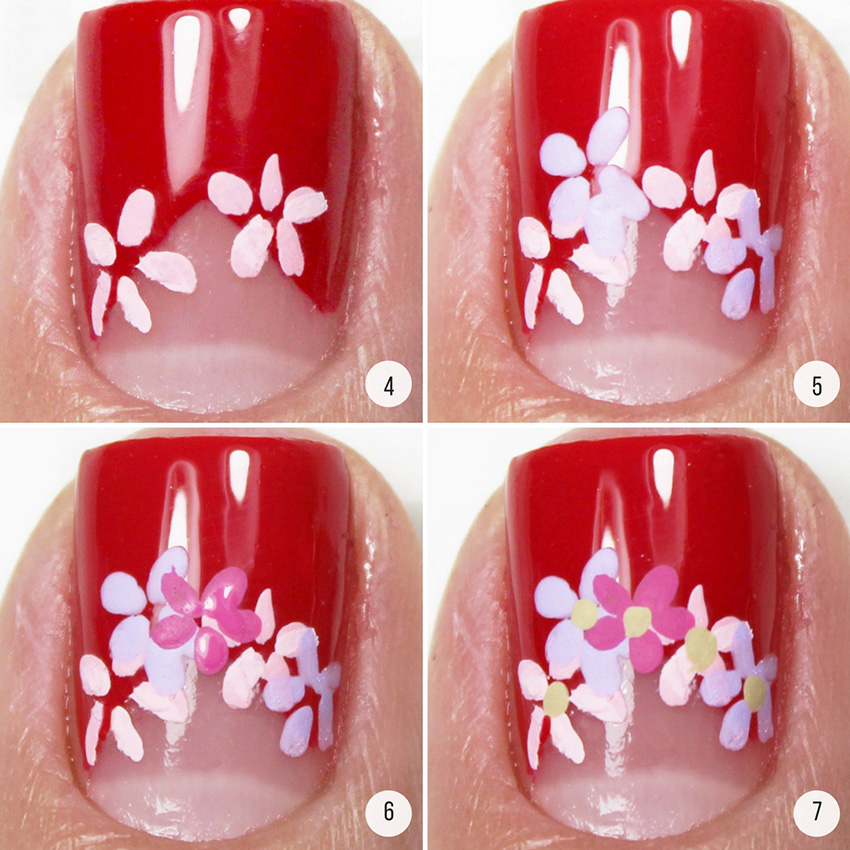
Step 4-5: Paint on the pink flowers first. Next, draw on some purple flowers in the spaces in between the pink flowers.
Step 6: FInally, add a hot pink flower in the center.
Step 7: Using a light brown acrylic paint, add centers to the flowers.
Finish this look off with a coat of glossy top coat!
The second look we have is a more traditional Valentine’s Day design.
Nail Lookbook #2: Chevron Heart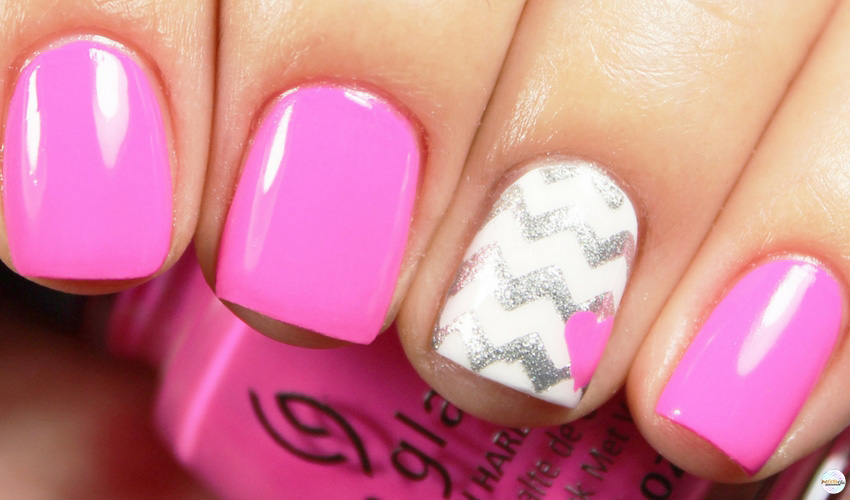
What You Will Need
- Pink Polish
- Pale Pink Polish
- SIlver Metallic Polish
- Chevron pattern Nail Vinyls
- Dotting Tool
- Nail Art Brush
- Glossy Top Coat
DIRECTIONS:
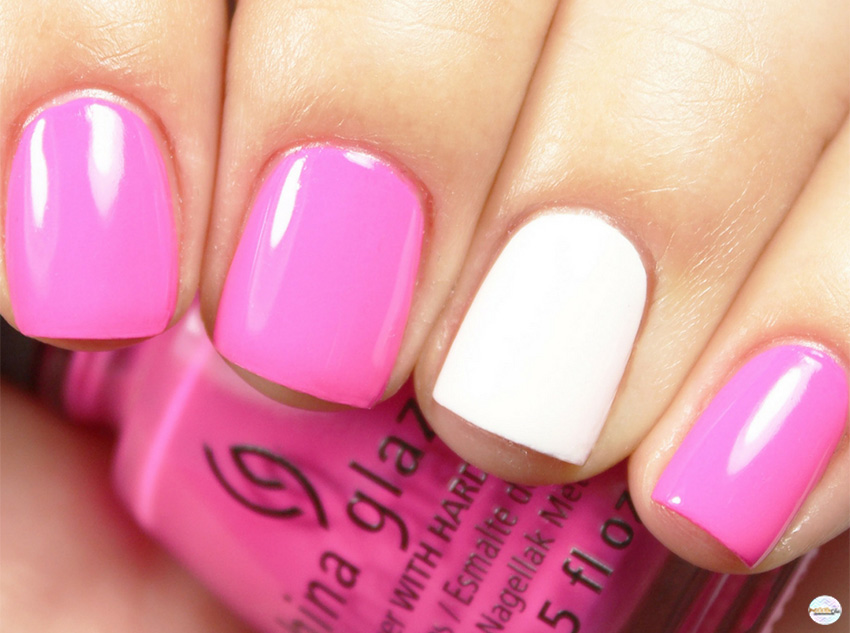
Step 1: Start by painting the nails a bright pink, except the ring finger, which will be painted white as show above. Add of coat of glossy top coat and let them dry completely.
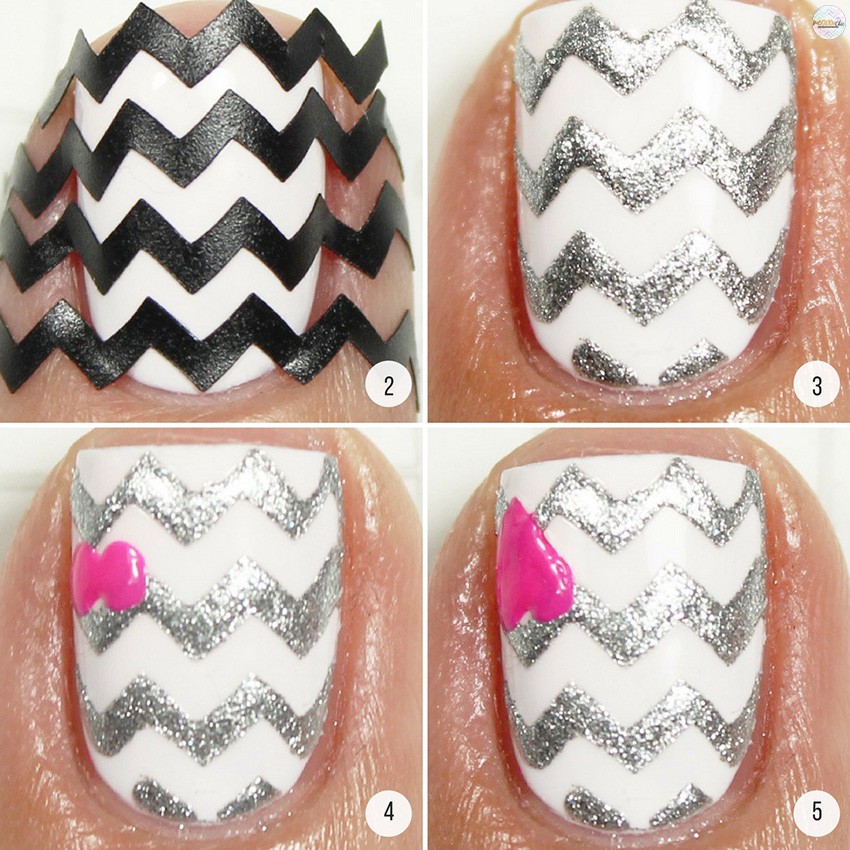
Step 2: I used chevron nail vinyls from What’s Up Nails to .create the zig zag design. Make sure to push them down along the edges to ensure polish won’t go in the tiny spaces.
Step 3: Using the silver metallic polish, paint over the nail vinyls. As soon as the polish has been applied, peel off the nail vinyls. Since we secured the layer of polish with glossy top coat in the first step, you can lightly clean up any mistakes of the vinyl. Tip: Dip a clean up brush into acetone and very lightly remove any mistakes. Be careful to not push too hard, as it will remove the bottom layer as well.
Step 4: Using a dotting tool, dip into the hot pink polish and place two dots close together.
Step 5: Use the nail art brush to complete the shape of the heart.
Simply seal with a layer of glossy top coat.
If you like these designs then be sure to incorporate them into your Valentine’s Day ootd. Also, don’t forget to take the day to cherish all the loved ones in your life, not just romantic ones.
Happy Valentine’s Day everyone! .






So pretty, I never succeed making nail art. They always ended up in failure.
These designs are all so cute! I love the negative space flowers 🙂
These are so pretty! But if I tried to do these myself it would be a huge mess!
these nails are gorgeous! love nail art!
These are really cute! I’d gotten away from painting my nails for a while because I use my hands all day. This makes me want to try again.
So cute and this looks fairly easy to do. Will have to try 🙂
I absolutely love these and they’d be great for Mother’s Day too (which is March here in the UK). I will share with my friends as they are much better at doing them than me,
I can’t wait to share these with my daughter. She was just looking up ways to paint her nails (and mine!)
You make it look so easy. I now want to paint my nails
I think these are very cute. I’m not an artsy person so I get mine done. My co worker is good with doing her own. I will show her these!
I am not much of an artist so my nails never look as polished and as perfect as your gorgeous nail art lookbooks. Out of the two however I definitely would use the first one as I like the overlapping flowers and the contrast between the red and the natural coat.
I LOVE the chevron & heart nails. Those are so, so cute. I feel like I would totally mess it up though! haha!
I absolutely love the chevron print design, I need to attempt recreating it. Now I just have to work on my patience when it comes to doing my own nails – haha!
I LOVE the floral nail art – so pretty and perfect for spring, too!
Oh how pretty! I love the flowers! I am useless at painting my nails full stop, let alone with these intricate designs!
I wish I could do nail art especially at this time of year. I adore hearts and would love to wear them on my nails. Right now I just use a tiny sticker but it doesn’t look like yours.
Oh my gosh! These are amazing. Seriously I’m so impressed with all the designs.
I love designing my nails and you make it look so easy. Your designs are really awesome. I love them all and I will be trying them out.
Tthese are very cute. I now want to paint my nails like this.
Im terrible at doing my nails, they always smudge. Would love to have those pink zig zag ones!
Those are some really cute designs. I am going to share this with my sister, she will love it.
I love these! So creative and feminine. Perfect colors too for Valentines. You have given me some ideas 🙂
So pretty! I’m not great at doing my own nails.. But you make it sound so easy!
Very cute nail art! I love the tutorials and the photos, I could very each of them all year round!
These are so adorable. I’d try them out one day
The chevron hearts look so nice, I find it really hard to do my own nails and have them looking even half as nice as this x
I wish I could ddo this, I have such shaky hands, think I will have to find nail stickers lol!
I love the negative space flowers! Such a great idea! I don’t think I have the steady hand for these designs, but great inspo!
the chevron pattern is my favourite! you make it look so simple and effortless with your tutorial, it looks like something i’ll actually be able to do 🙂
Love these! I am terrible at doing my own nails but I love this step by step tutorial.
I really really enjoy looking at new nail art like this! It is always so inspiring. I am going to have to try some of these.
The flower design looks SO good and it’s great for spring too. I think I might have an easier time with that than the chevron design, because my OCD brain would want everything to line up perfectly lol!
These are fabulous! I need to try one for Vday!
These are both really pretty nail designs. I would love to have my nails done like this even if it wasn’t Valentine’s Day.
Im usually festive enough to want to paint my nails. I should of did this for my Galentines Brunch this weekend!
These designs are so pretty . My eyes got stuck on the first one that’s the prettiest with the flowers . I’m going to try that.
Cute nail arts. Valentines reminds us that we should always look good and feel good about ourselves.
How creative!Oh goodness!These nails look too lovely. I love the hot red one especially…good guide you’ve shared especially for someone like me who visits the salon to get my nails done.
I have always liked to see grey and pink together, and I love a little silver added in. This looks like a fun design for any occasion.
These nail arts are so pretty! I used to love nail art and these seem quite easy to do. The first one could also be perfect for Spring!
My girlfriend would love to read these post. nice share
Those nail design are really cute and pretty.
These designs are so cute, I normally only do plain colours, but I should give some of these designs a try.
Nail art seems so complex I don’t know if I could do it! This is so pretty though, thanks for sharing.
These are all really cute. I need to take better care of my nails and do more stuff like this.
Very nice nail design. Thanks for the idea!
oh DANG!! SO SO darling! I am going to have to try these. I LOVE the colors you have used. Perfect for V-Day and spring!!
I love the step-by-step that you give us. Using tape is such a good idea! I will have to try that at some point!