
















[dropcap]W[/dropcap]ith Halloween just around the corner, we wanted to bring you two amazing Halloween Nail Art tutorials featuring Frankenstein and his bride, along with a modern take on the classic pumpkin motif. These Halloween inspired nail looks are perfect for everyone, whether you’re looking to add a bit more flare to your costume or simply craving some Halloween nail inspiration.
Nail Art #1: Frankenstein & Bride
What you will need:
- Green polish
- Glitter polish
- Acrylic paints in black, white, and red
- Base and top coat
- Tiny nail art brushes
- Acetone
- Clean up brush
- Dotting tool
How To
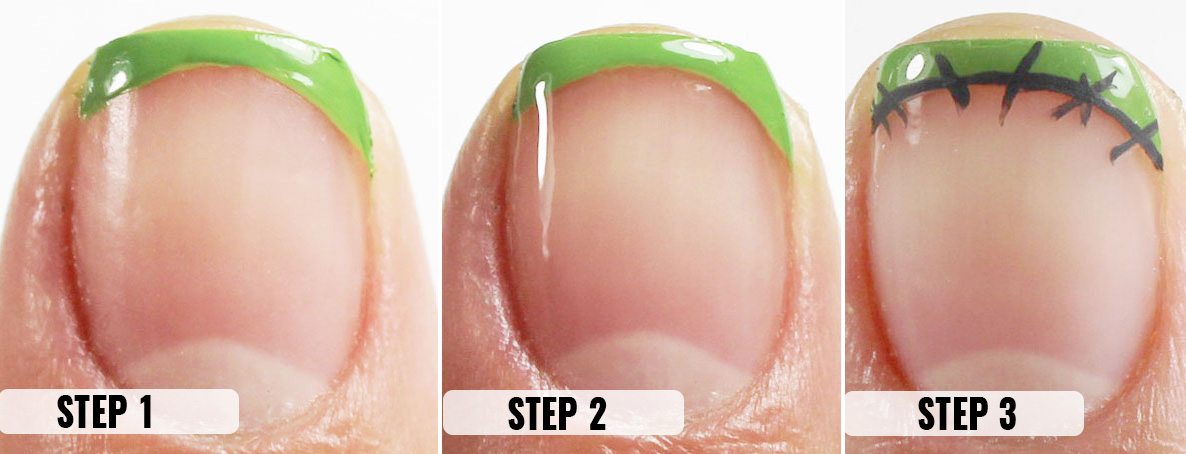
(Step 1)
Creating a French tip is super easy; there is no need to worry about making your lines perfect! For this technique, you don’t need to put a base coat. Simply, paint a rough guess of where you want the French tip to be with the brush of the nail polish. Tip: A base coat isn’t necessary prior to this step because we are just going to have to clean up the lines with acetone and a clean up brush afterwards.
(Step 2)
Dip a clean up brush into acetone and carve out where you want your French tip to be. This is a really easy way to create a French tip without the use of a nail vinyl, or having to be super careful. Once you’ve cleaned up the lines, apply a coat of glossy topcoat.
(Step 3)
Wait for the topcoat to dry, then with a thin nail art brush, and draw a thin line between your natural nail and the French tip using black acrylic paint. Then, with the same brush, paint stitches along that line. Add some cross-stitches too. Remember, if you mess up, it’s easy to wipe off the acrylic paint since we put a top coat layer. Tip: You can clean up with a napkin dipped in water, or you can lightly scratch off the acrylic paint.
Finish off with another layer of top coat.
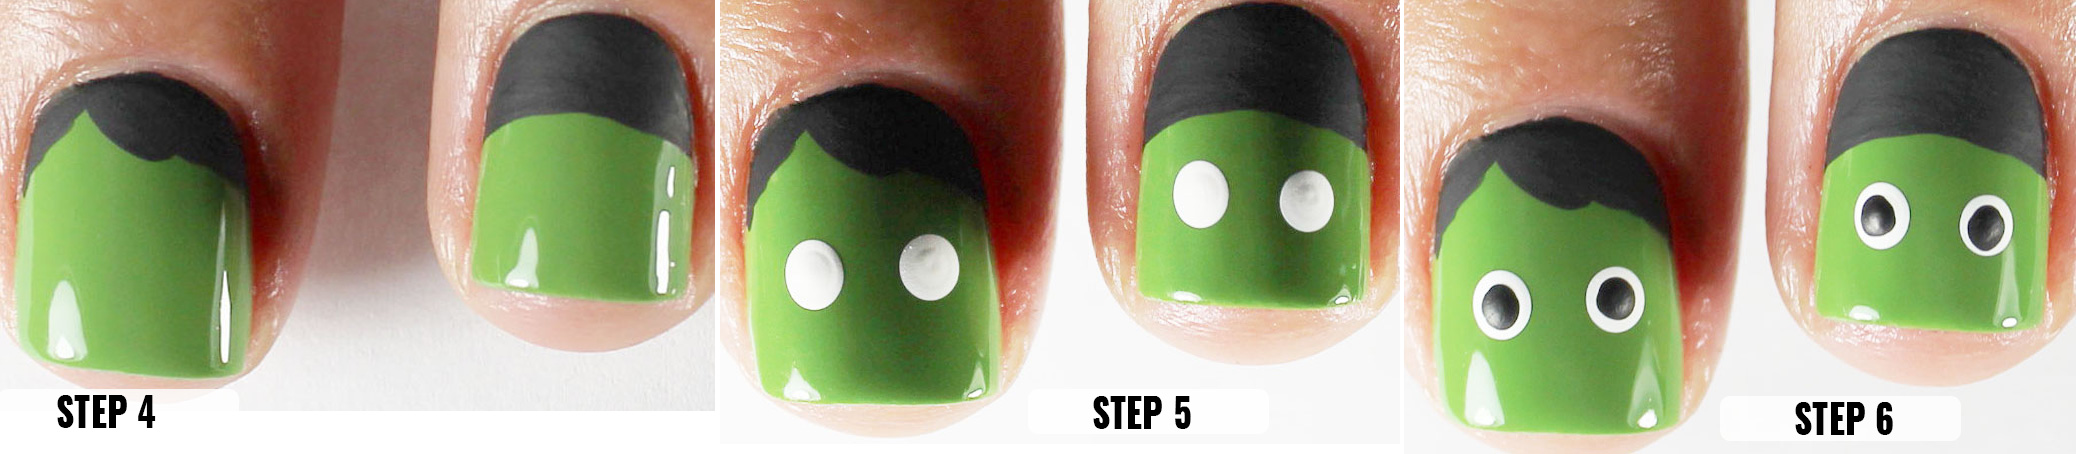
(Step 4)
Now it’s time to draw our cute versions of Frankenstein and his bride! First, we are going to start with their hair. We used black acrylic paint and a nail art brush to create a basic hairstyle for Frankenstein. Then, drew a half moon for his bride. Tip: Sometimes acrylic paint can be patchy, so just wait for it to dry, then fill in any bald patches.
(Step 5)
Use the bottom of a pen to create their eyes. Dip the bottom of a pen into white acrylic paint, then paint on two dots on the nail where their eyes should be. Tip: Try to always test out your dot on a sheet of paper before applying them to your nails.
(Step 6)
Using a smaller dotting tool, Dip it in black acrylic paint and create their eyeballs.

(Step 7)
Now it’s time for his bride to have some details! Paint on some cute eyelashes for her using a thin nail art brush. Then, with white acrylic paint, draw the white streak in her hair. Tip: We suggest using a really thin brush for this and making sure the brush doesn’t have any globs of paint.
Next, paint a cute red bow for her hair using the same nail art brush and red acrylic paint. Add some dimension to the center of the bow, using a dotting tool and glitter polish.
(Step 8)
Time to draw on some adorable smiley faces for Frankenstein and his bride! Do so using a thin nail art brush and black acrylic paint to create their smiles.
(Step 9)
Wait a bit for the acrylic paint to dry, and then apply a topcoat! Voila! You now have an adorable Frankenstein manicure just in time for Halloween!
Now to the next Halloween Inspired Nail Art
Nail Art #2: Modern Pumpkin
Pumpkin nail art is an awesome way to get into the Halloween spirit. We have updated this classic design by adding a pop of glitter. Keep reading for a step by step guide on how to recreate this fun, festive nail look.
What you will need
- Nail polish in black, white, and orange glitter
- Acrylic paint in orange, light orange, green, and brown.
- Nail art brush
- Striped nail vinyls
How To
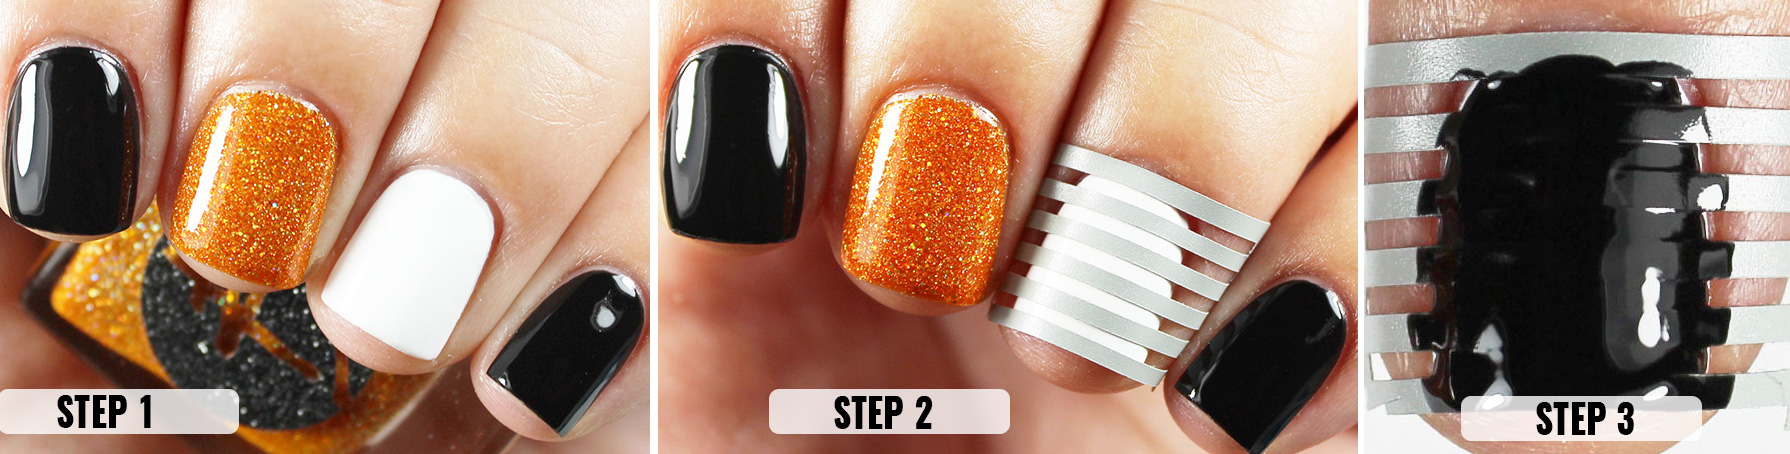
(Step 1)
Start off by applying a base coat. Now begin to paint your nails with the following nail polish colors: black, white, and orange glitter. These will be your base colors. Once the nails are dry and clean up the nail, apply a layer of your favorite topcoat.
(Step 2)
Once the topcoat has dried on the ring finger, we are going to adhere a nail vinyl. Make sure to stick down the vinyl firmly, especially around the edges of the nail.
(Step 3)
Paint over the vinyl with your black polish. Peel off the vinyl as soon as you’re done painting. Tip: If there are any mistakes you can always take a nail art brush dipped in acetone and lightly swipe it away. The topcoat layer we added before this step allows us to do this.
Once the black stripes are dry, add a layer of topcoat.
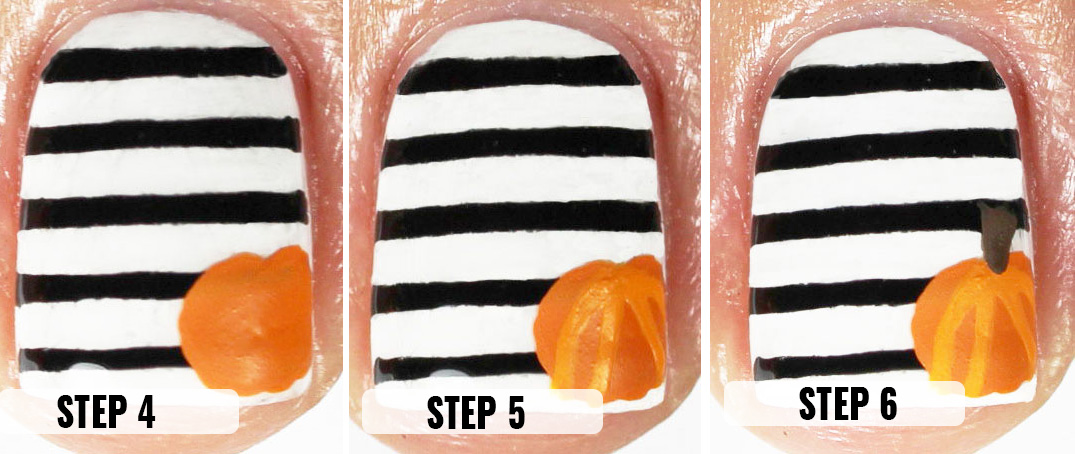
(Step 4)
To add a bit more to the stripes, dip a nail art brush in orange acrylic paint and paint on a pumpkin. Don’t worry if it’s a bit wobbly since pumpkins aren’t perfectly round.
(Step 5)
With a lighter orange acrylic paint, paint lines going down the sides of the pumpkin. This helps add dimension.
(Step 6)
Next paint on a stem using brown acrylic paint.

(Step 7)
And finally, add vines using green acrylic paint. We made ours curly just to make it a bit more fun.
(Step 8)
Finish off with a layer of topcoat.
Now we have a cute sparkly pumpkin manicure for this Halloween season!
If you recreate this look, remember to tag us at @modernchicmag using #modernchicnails. We would love to see your recreations.
Remember to check out the other amazing Halloween articles like our Scare Crow Nail Tutorial You’ll Love for Fall and our 4 Spooktacular Halloween Party Food Ideas & Recipes
Also, feel free to let us know what your Halloween plans are in the comment section below. Happy Halloween!




Great tutorial and designs thank you for sharing I have never attempted to do anything like this before x
These are some fantastic nails! I can’t put stuff on my nails because it feels weird to me, but my daughter loves to do hers. I’ll show her this post!
OMG these are just adorable! My nails need doing and I just love these tutorials. What a fab post!
Fun! I love the Modern Pumpkin design the best!
I love these nail designs. I have only really started painting my nails in the last year and your tutorial is easy enough for me to follow. The Frankenstein and Bride is my favorite.
How fun! I must admit I never do my nails like this… but I will give it a try! I think my daughter would love this too, so it’ll be our bonding fun time on Saturday 🙂 thanks for the tutorial!
Such cute nails. I wish I had this talent for painting nails.
Pretty cool techniques. My parents work as a nail tech so I;ve been around the scene for a while.
These are both such cute manicure ideas and you make it look so easy! 🙂
My wife would love these! This takes a lot of talent to make them look so nice! Kudos!
I love the Frankenstein ones! They’re so creative and I like the green color!
Wow, love this nail art so much, more so the green one.. What character does it have? Hulk? Not sure though
Wow such an in-depth tutorial, awesome! I love the Halloween themed nail art – so cute!
Wow these are so fun. They looks so clean too. My fave is the Frankenstein ones. If I did this, it be all messy. Great job!
Wifey just loved the original style nail art. She especially loved the step by step guides. kudos!
Great step by step procedure! This looks so fun! Thanks!
What fantastic looks and you’ve make it seem so simple with the step by steps.
Ami xxx
such a lovely tutorial. Simply gorgeous
Omg how cute! Love both nail arts, so creative and pretty!
These are super adorable! I’m in love with the Frankenstein design (and I also love the orange glitter)! So cute!
This is amazing, I love pumpkin nails, it is the perfect mix to keep your nails still classic but add a little halloween fun!
This nail art is really amazing!! With the steps, it looks quite simple too! Love the colours! 🙂
Although I prefer my nails done in solid color, I’d love to spice (and spook) things up for halloween! These are awesome!
I have been looking for a good nail design for my Halloween party. I am in love with these Frankenstein nails. I will have to give it a try tomorrow. I am sure they will be a big hit.
Such cute ideas! I am so doing this this weekend!
Sondra xx
prettyfitfoodie.com
These are super cute! OMG I love it. I can do this on my toenails 🙂
I always say I am not very creative. Seeing your nail designs it just reminds me once more I never think of things like this. I just love how cute and festive they are.
Oh my goodness those Frankenstein nail designs are adorable. I am going to try this myself.
Loving both designs, hard to choose which to go form maybe both and have mixed up on both.
Very creative!! Those nail art design totally fits Halloween!!
Love the designs! You’re very talented. These designs are super-cute for Halloween. They’re both so great, and I can’t even choose between the two. Good job!
I’ve never tried to design my own Halloween nails but now I want to. I love both of these so it would be hard to choose which to do first.
I love These! the Frankenstein ones are my favourite but I have no idea how you manage to get such straight lines on the striped pumpkin, mine are always an epic fail!
nail art is… for patient and manual people, and you definitely are one of them 🙂 I wish I could be as good as you. Bu the way I’ll try the first one, maybe I can make it 🙂
That Frankenstein one is super cute. Totally trying it!
WOW those Frankenstein nails are AMAZING!! I wish I was talented enough to do those, I am super clumsy!
I actually love both options for the halloween nail art options! Number two with the pumpkin though is my favorite love how easy it is to follow!
Love the designs! You’re very talented. Love the Frankenstein one!
These nails designs are super cute! I really love the pumkin one!
I absolutely love doing theme nails. These all look like so much fun.
I am pretty challenged at doing nails like this myself. These tutorials are definitely helpful.
These are cute nail designs. You are talented. I love the pumpkin one.
I always love looking at the coll nail art designs but admittedly never have the patience to try it myself. I also work in the Corporate world so it likely wouldn’t be allowed. It’s so fun though!
These are both super cute! I like how you went step by step, I’m so bad at nails!
How cute are these nail art ideas!? I love them so much.
ADORABLE! I love the pumpkin one. I love stuff like this.
This is so awesome! I had no idea that you could use acrylic paint on nails…gonna so try that!
I think my kids would love to see the Frankenstein nail art on their mom’s fingers. There’s still time today. Going to forward this post to my wife.
These are some really cool nails indeed. I love the Frankenstein and his bride nail art tutorial which I will have to due with my niece. Thanks for sharing the tutorial.